- Subscribe to RSS Feed
- Mark Topic as New
- Mark Topic as Read
- Float this Topic for Current User
- Bookmark
- Subscribe
- Mute
- Printer Friendly Page
Help Protect Medical Workers from COVID Exposure When Ventilating Patients - How to Build Intubation Tents using PVC Pipe
04-15-2020 07:22 PM - edited 04-16-2020 09:23 AM
- Mark as New
- Bookmark
- Subscribe
- Mute
- Subscribe to RSS Feed
- Permalink
- Report to a Moderator
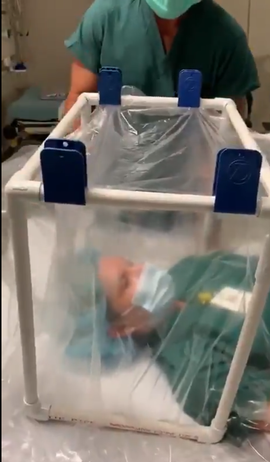
Dr. Joseph Eddings of Austin, Texas has developed a design that can help protect medical workers when they ventilate patients, a procedure called "intubation."
The process of putting patients onto ventilators puts doctors and nurses at a high risk of infection. Intubation Tents are a new type of Personal Protective Equipment that help hospital workers on the frontlines looking after those in critical condition from the coronavirus.
This is an easy to follow step-by-step guide. No engineering experience required. I hope you will join us.
Why Build Intubation Tents To Help Protect Doctors and Nurses?
You're in? Great. Each tent takes about 30 minutes to build and costs around $21. Purchase the supplies from your local hardware store and get building!
See a photo of the required tools and parts here:
Tools (per volunteer):
1X PVC cutter
1X Tape measure, inches
1X Rubber hammer
1X Sharpie marker
2X Nitrile gloves or similar (to keep PVC glue off skin)
1X Small can of slow setting PVC cement with small brush
Parts (per tent):
2X 1/2 inch PVC Tee fitting, non threaded
4X 1/2 inch PVC 3-way corner elbow fitting, non-threaded
6X 1/2 inch PVC L fitting, non threaded
2X 1/2 inch by 10 foot schedule 40 PVC pipe, non-threaded (each tent requires roughly 15 feet of pipe)
Cut the PVC:
3X 1/2 inch PVC pipe, cut to 20 inch length
2X 1/2 inch PVC pipe, cut to 16 inch length
6X 1/2 inch PVC pipe, cut to 12 inch length
2X 1/2 inch PVC pipe, cut to 4 inch length
2X 1/2 inch PVC pipe, cut to 2 inch length
Assembly Steps:
1. First assemble and glue the left side pieces as shown.
The lengths of each piece in inches are marked. Use the photo as a guide. After assembly, straighten and align the pieces.
Notes:
- Use slow drying glue allows time for alignment after assembly.
- Assemble in a well ventilated area to avoid breathing fumes.
- Because glue is difficult to sanitize, brush the glue sparingly on the inside of the joints using a small brush to avoid getting glue on the outside.
- Wear face masks and observe social distancing when assembling in groups.
2. Next assemble and glue the right side pieces as shown.
3. Then assemble the front side pieces as shown.
CONGRATULATIONS!
Finally, deliver to your local Intensive Care Units!
More assembly photos here:
https://photos.app.goo.gl/HVfKM6qBQfjvSYUi8
How to build explanation video:
How to use video for doctors and nurses:


